2022年11月30日 星期三

使用 Windows Terminal透過 SSH 連線到遠端主機

在公司的工作機是使用 Windows筆電,有時候會需要連到遠端 Linux機器,記錄一些會使用
到的指令。

SSH

根據微軟官網,Windows 本身已經內建 SSH client應用程式。


ssh user@machine

透過 ssh連線到遠端的主機,之後會跳出提示輸入密碼。


exit

logout
Connection to machine closed.

退出 ssh連線回到 Windows Terminal。


SCP

SCP是使用 SSH的遠端加密傳輸檔案指令。


scp C:\a.txt user@machine:~/

將本地的 C:\a.txt傳送到遠端 machine的 user目錄中。

scp C:\a.txt user@machine:~/b.txt

將本地的 C:\a.txt傳送到遠端 machine的 user目錄中,並命名成 b.txt。


scp user@machine:~/b.txt C:\

將遠端 machine的 user目錄中 b.txt傳送到本地端的 C:\目錄中。

scp user@machine:~/b.txt C:\c.txt

將遠端 machine的 user目錄中 b.txt傳送到本地端的 C:\目錄中,並命名成 c.txt。


scp -r user@machine:~/test C:\

將遠端 machine的 user目錄中 test目錄遞迴複製傳送到本地端的 C:\ (C:\test)。

scp -r C:\test user@machine:~/

將本地端的 C:\test目錄遞迴複製到遠端的 user目錄中 (~/test)。

2022年11月25日 星期五

[scikit-learn] datasets

最近開始在上 Coursera台大林軒田的 Machine Learning的課程,第二周的內容重點是關於 PLA
(Perceptron Learning Algorithm),於是我就想實作關於 PLA的程式碼。

首先是要有一組線性可分的資料,但要手動產生線性可分資料過於麻煩,而 scikit-learn提供
datasets 這個為機器學習使用者所用的資料集合。

以 iris plant dataset為例,其提供了鳶尾花的植物特徵資料:

https://scikit-learn.org/stable/datasets/toy_dataset.html
  • 花萼長度 (sepal length in cm)
  • 花萼寬度 (sepal width in cm)
  • 花瓣長度 (petal length in cm)
  • 花瓣寬度 (petal width in cm)
  • Class:Setosa、Versicolour及Virginica

三個品種的鳶尾花各50組,總共150組資料。透過 load_iris來獲得:

https://scikit-learn.org/stable/modules/generated/sklearn.datasets.load_iris.html

參考scikit-learn提供的範例The Iris Dataset來看其資料分布的情形。可以用來練習線性可分
的情況,也能練習在線性不可分下中使用 Pocket Algorithm。

用 matplotlib畫出其資料分布圖:


2022年10月29日 星期六

[Python] Decorator 裝飾器 (2) - wraps

上篇文章:
[Python] Decorator 裝飾器

在使用 decorator時,會使得原本被包裹的 function 的 attribute資料遺失。

import time

def measuretime(func):

    def wrapper(*args, **kwargs):
        start = time.time()
        result = func(*args, **kwargs)
        end = time.time()
        print (func.__name__, end - start)
        return result

    return wrapper

@measuretime
def count_down(n):
    '''Counts down from n'''
    while n > 0:
        n -= 1

if __name__ == '__main__':
    print (count_down.__name__)
    print (count_down.__doc__)

Output:

wrapper
None

可使用 functools的 decorator wraps來避免這種情況:

import time
from functools import wraps

def measuretime(func):
    @wraps(func)
    def wrapper(*args, **kwargs):
        start = time.time()
        result = func(*args, **kwargs)
        end = time.time()
        print (func.__name__, end - start)
        return result

    return wrapper

@measuretime
def count_down(n):
    '''Counts down from n'''
    while n > 0:
        n -= 1

if __name__ == '__main__':
    print (count_down.__name__)
    print (count_down.__doc__)

Output:

count_down
Counts down from n

Unwrapping

wraps提供了另一個有用的功能,可以使已經套用過 decorator的 function回復成套用前的
function。透過 __wrapped__這個屬性來使用原本的 function。

import time
from functools import wraps

def measuretime(func):
    @wraps(func)
    def wrapper(*args, **kwargs):
        start = time.time()
        result = func(*args, **kwargs)
        end = time.time()
        print (func.__name__, end - start)
        return result

    return wrapper

@measuretime
def count_down(n):
    '''Counts down from n'''
    print (f'Counts down from {n}')
    while n > 0:
        n -= 1

if __name__ == '__main__':
    count_down(500000)
    org_count_down = count_down.__wrapped__
    org_count_down(500000)

Output:

Counts down from 500000
count_down 0.021966218948364258
Counts down from 500000

2022年10月23日 星期日

[Python] Decorator 裝飾器 (1)

最近發現自己在 Python上的技巧需要提升,雖然以前就知道 Decorator的概念,但我在
實際應用上很少使用,趁此機會來重新理解下。

Decorator簡單來說,是一種 function,並以另一個 function作為輸入,用來擴充輸入
function的功能。

以下面程式碼為例:

def hello_alice(hello_func):
    hello_func("Alice")

def say_hello(name):
    print (f"Hello {name}")

if __name__ == '__main__':
    hello_alice(say_hello)

Output:

Hello Alice

這裡 hello_alice使用 say_hello當作參數傳入, hello_alice就是作為 say_hello
decorator。


Syntactic Sugar

通常 decorator會使用更簡潔的語法糖 "@"包裝,使用上面的範例修改:

def hello_alice(hello_func):
    hello_func("Alice")

@hello_alice
def say_hello(name):
    print (f"Hello {name}")

if __name__ == '__main__':
    say_hello

Output:

Hello Alice

@hello_alice代表將 say_hello當作參數傳入 hello_alice function。


Inner Functions

Python的 function也能夠在另一個 function中被定義,稱為 inner function。inner function可以
讓 decorator的使用更加靈活:

def greet(func):

    def wrapper(*args, **kwargs):
        result = func(*args, **kwargs)
        return result

    return wrapper

@greet
def say_hello(name):
    print(f"Hello {name}")

if __name__ == '__main__':
    say_hello("Alice")
    say_hello("Bob")

Output:

Hello Alice
Hello Bob

其中 wrapper就是作為 decorator @greet的 inner function。 並且會使用 *args**kwargs來接收參數。


Example - Measure Time

一個 decorator經典的範例是用於測量 function執行所花的時間:

import time

def measuretime(func):

    def wrapper(*args, **kwargs):
        start = time.time()
        result = func(*args, **kwargs)
        end = time.time()
        print (func.__name__, end - start)
        return result

    return wrapper

@measuretime
def count_down(n):
    while n > 0:
        n -= 1

if __name__ == '__main__':
    count_down(500000)

count_down 0.018976449966430664

使用 decorator @measure的來測量 count_down function所花費的時間。

2022年9月15日 星期四

cURL 使用筆記

https://curl.se/

最近在工作上碰到有腳本使用 cURL來即時向 server請求資料,趁此紀錄一些其使用方法。

HTTP Request


curl -X [GET|POST|PUT|DELETE|PATCH] URL

-X 參數用來對 URL發出 HTTP request,後面帶入HTTP method。


curl -X [GET|POST|PUT|DELETE|PATCH] URL -x PROXY_ADDRESS:PROXY_PORT

-x 通過代理伺服器 PROXY_ADDRESS:PROXY_PORT使用 cURL。

2022年9月3日 星期六

jq - 輕量級 json解析工具

官方網址:

https://stedolan.github.io/jq
github
https://jqplay.org

最近工作上接觸到其他人寫的 script,使用 jq來將 curl所得到的 .json檔案解析成 .csv檔。
雖然目前只使用到 jq一點點功能,但還是趁此機會紀錄一下。

依照官網的範例,可透過 github的 api獲取 json格式的 jq最近 5個 commit資訊:

curl 'https://api.github.com/repos/stedolan/jq/commits?per_page=5'

使用 jq過濾 json:

curl 'https://api.github.com/repos/stedolan/jq/commits?per_page=5' | jq '.'

只取出第一個 commit的資訊:

curl 'https://api.github.com/repos/stedolan/jq/commits?per_page=5' | jq '.[0]'

取出所有 commit中的 sha資訊:

curl 'https://api.github.com/repos/stedolan/jq/commits?per_page=5' | jq '.[] | {sha: .sha}'

{
  "sha": "cff5336ec71b6fee396a95bb0e4bea365e0cd1e8"
}
{
  "sha": "f2ad9517c72f6267ae317639ab56bbfd4a8653d4"
}
{
  "sha": "c4d39c4d22f2b12225ca1b311708f7e084ad9ff8"
}
{
  "sha": "174db0f93552bdb551ae1f3c5c64744df0ad8e2f"
}
{
  "sha": "29cf77977ef52eec708982b19bf9d2ec17443337"
}


jqplay

也可以使用 jqplay的網站來嘗試 jq的輸出結果:


2022年7月29日 星期五

PE/COFF header of UEFI image

參考網站:
Microsoft pe-format
Wiki Portable_Executable
osdev COFF

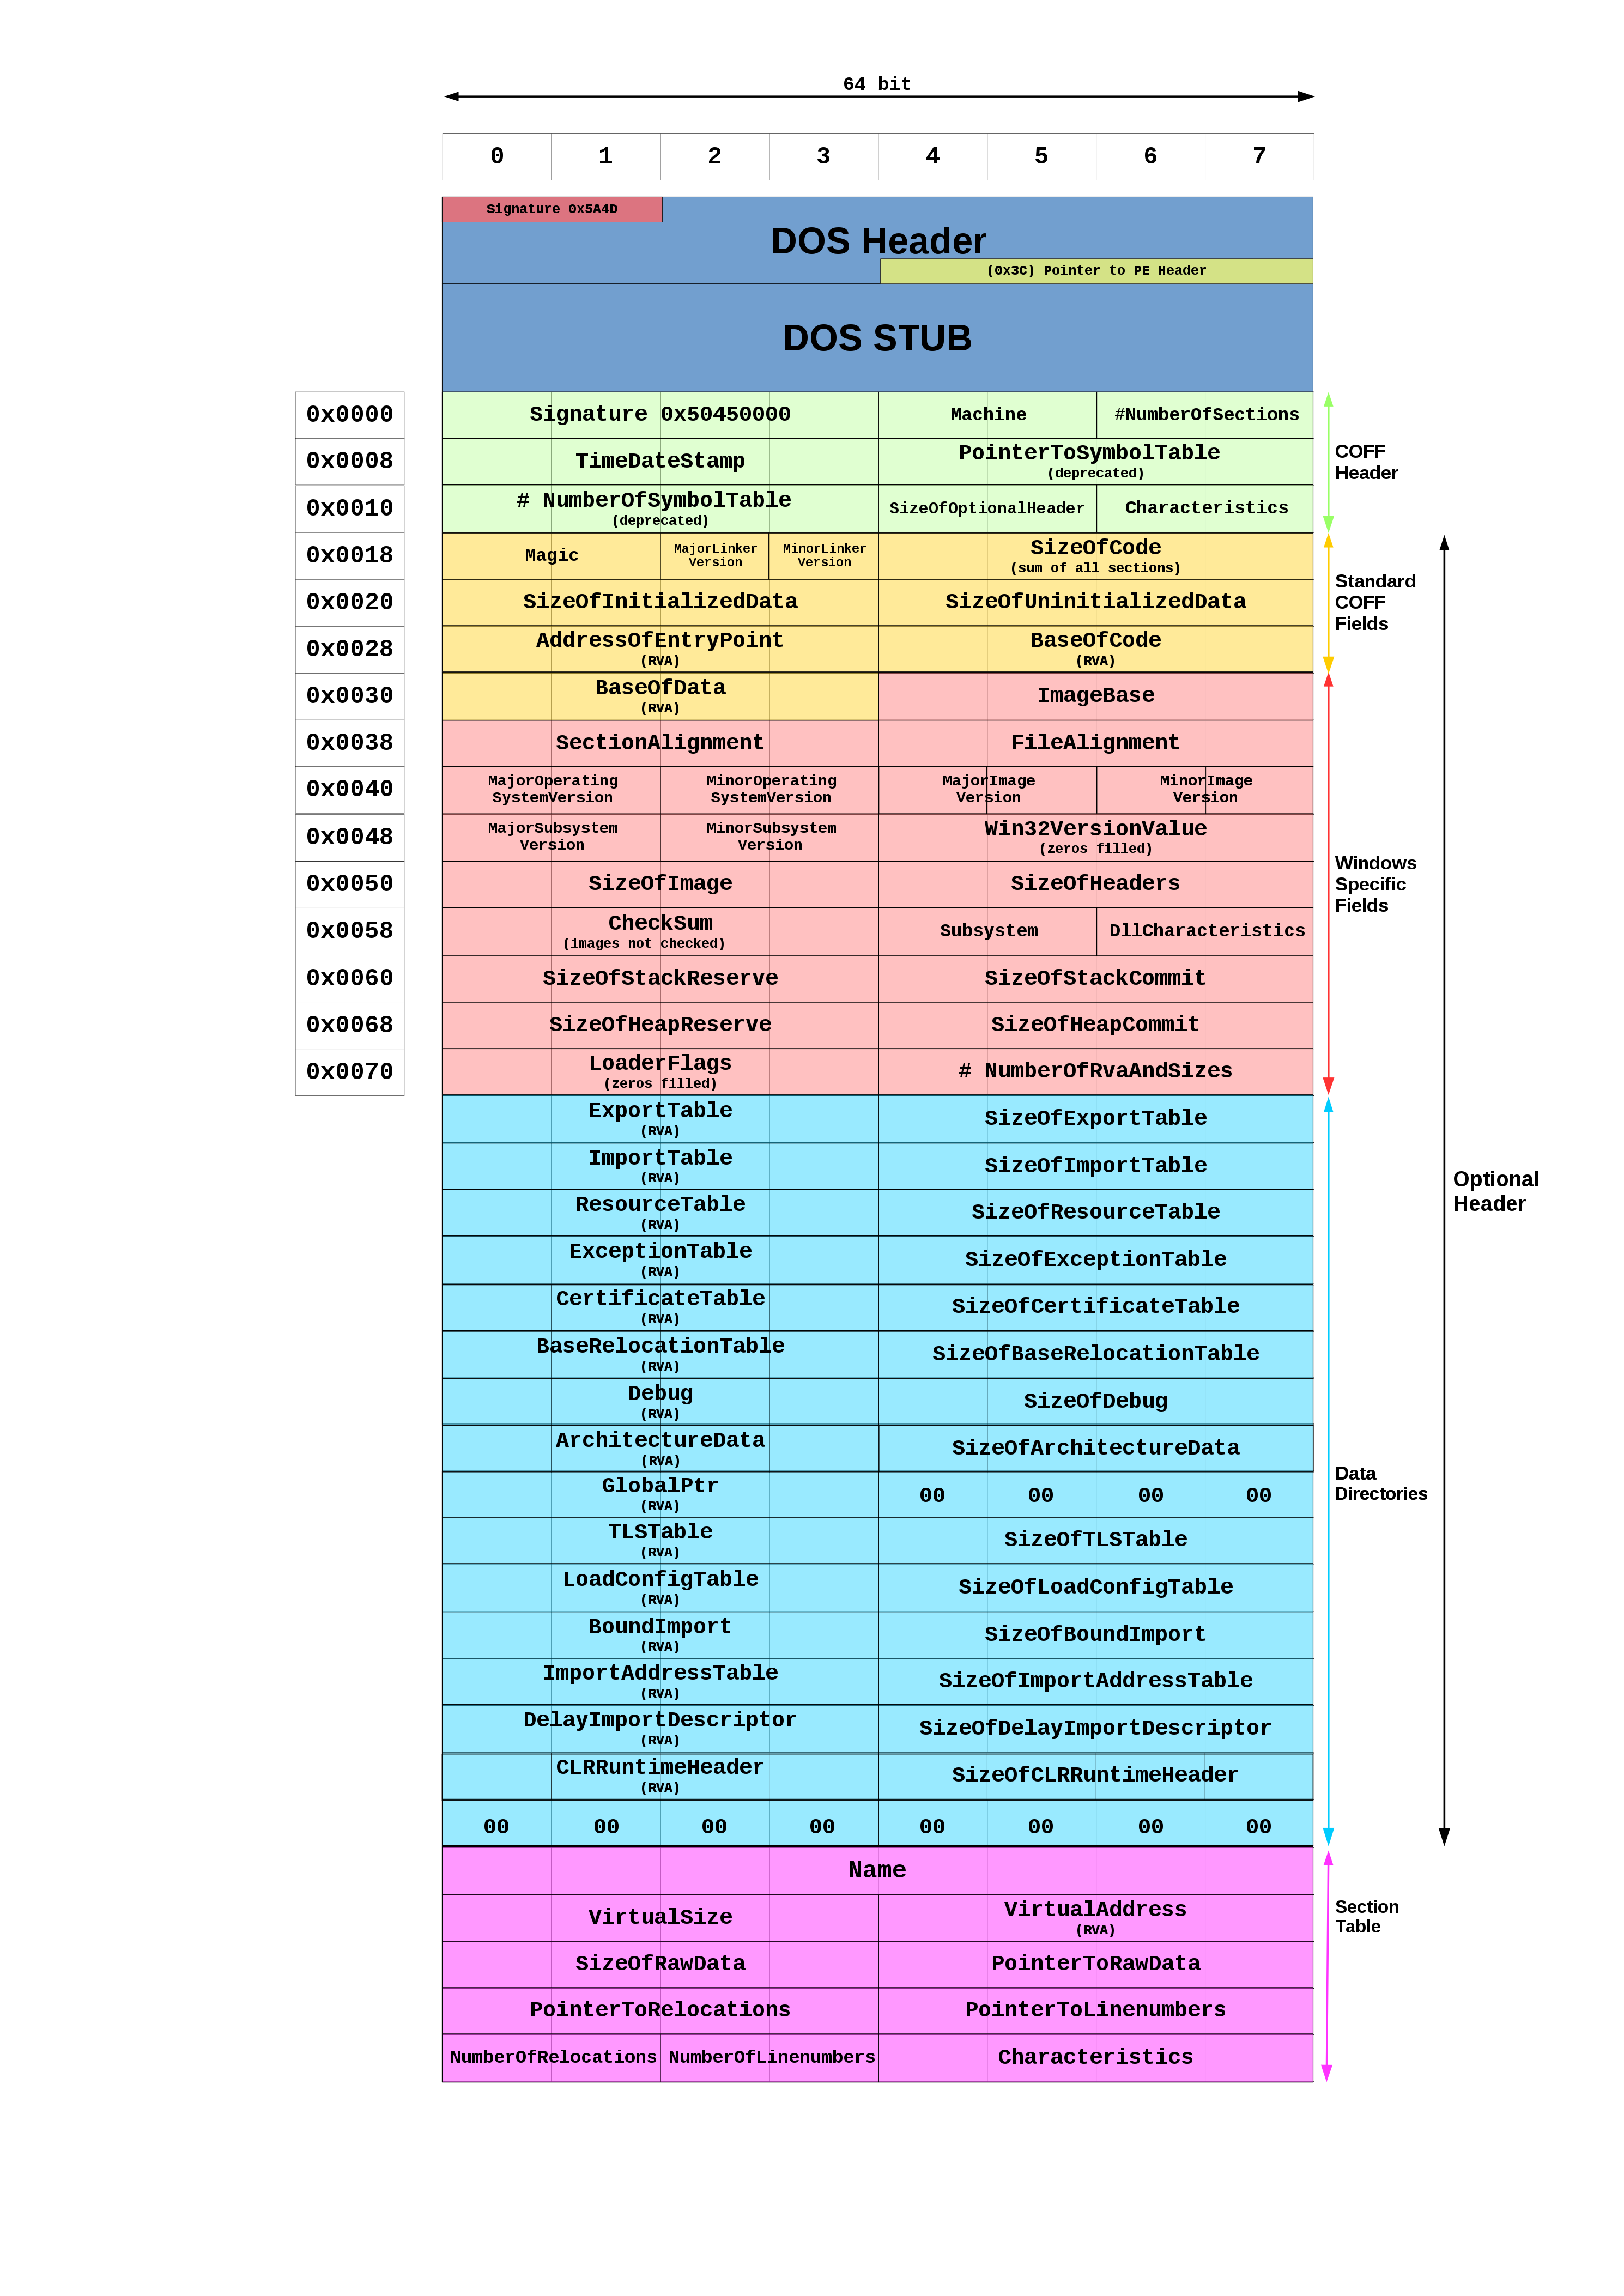
UEFI image都是遵循微軟所定義的 PE/COFF格式,PE/COFF的格式可以參考維基百科的這張 圖:

CC BY 4.0, Link

使用 EDK2的 CpuDxe.efi來觀察一下:

可以看到一開始的 0x40個 Byte,是 DOS Header,起始的開頭為"MZ"(0x4D 0x5A),在 EDK2 structure定義如下:

///
/// PE images can start with an optional DOS header, so if an image is run
/// under DOS it can print an error message.
///
typedef struct {
  UINT16    e_magic;    ///< Magic number.
  UINT16    e_cblp;     ///< Bytes on last page of file.
  UINT16    e_cp;       ///< Pages in file.
  UINT16    e_crlc;     ///< Relocations.
  UINT16    e_cparhdr;  ///< Size of header in paragraphs.
  UINT16    e_minalloc; ///< Minimum extra paragraphs needed.
  UINT16    e_maxalloc; ///< Maximum extra paragraphs needed.
  UINT16    e_ss;       ///< Initial (relative) SS value.
  UINT16    e_sp;       ///< Initial SP value.
  UINT16    e_csum;     ///< Checksum.
  UINT16    e_ip;       ///< Initial IP value.
  UINT16    e_cs;       ///< Initial (relative) CS value.
  UINT16    e_lfarlc;   ///< File address of relocation table.
  UINT16    e_ovno;     ///< Overlay number.
  UINT16    e_res[4];   ///< Reserved words.
  UINT16    e_oemid;    ///< OEM identifier (for e_oeminfo).
  UINT16    e_oeminfo;  ///< OEM information; e_oemid specific.
  UINT16    e_res2[10]; ///< Reserved words.
  UINT32    e_lfanew;   ///< File address of new exe header.
} EFI_IMAGE_DOS_HEADER;

而 0x3C則定義了PE Signature的位置,長度為 4 Bytes。以 CpuDxe.efi來說,是在 0x000000B8的位置。可從 0x000000B8的位置看到"PE\0\0"(0x50 0x45 0x00 0x00)的 PE Signature。

而從 0x40到 0xb7的這段空間稱為 DOS Stub,以前為了與 DOS相容而遺留下的產物,現在則直 接全部都填上 0x00。

PE Signature之後是 COFF File Header,在 EDK2中的定義如下:

///
/// COFF File Header (Object and Image).
///
typedef struct {
  UINT16    Machine;
  UINT16    NumberOfSections;
  UINT32    TimeDateStamp;
  UINT32    PointerToSymbolTable;
  UINT32    NumberOfSymbols;
  UINT16    SizeOfOptionalHeader;
  UINT16    Characteristics;
} EFI_IMAGE_FILE_HEADER;

COFF File Header長度為 20 Bytes,將其獨立拿出來看:


OffsetSizeFieldValueDescription
02Machine0x8664代表 x64系統使用。
22NumberOfSections0x0006Section Table 的數量。
44TimeDateStamp0x0
84PointerToSymbolTable0x0
124NumberOfSymbols0x0
162SizeOfOptionalHeader0x00F0Optional Header的 size。
182Characteristics0x2022IMAGE_FILE_EXECUTABLE_IMAGE +
IMAGE_FILE_LARGE_ADDRESS_AWARE +
IMAGE_FILE_DLL

緊接下來則是 Optional Header,其長度可以從 COFF File Header得知為 0xF0。

其分成 3個部分,Standard FieldsWindows Specific FieldsData Directories

Standard Fields
OffsetSizeFieldValueDescription
02Magic0x020BPE32+格式。
21MajorLinkerVersion0x0E
31MinorLinkerVersion0x1D
44SizeOfCode0x0000BAE0code section的 size。
84SizeOfInitializedData0x00001AE0initialized data section的 size。
124SizeOfUninitializedData0x0uninitialized data section的 size。
164AddressOfEntryPoint0x00001268entry point對ImageBase的相對位址。
204BaseOfCode0x000002C0code section對ImageBase的相對位址。

Windows Specific Fields (PE32+)
OffsetSizeFieldValueDescription
248ImageBase0x0
324SectionAlignment0x00000020section在記憶體中為 32 Bytes alignment。
364FileAlignment0x00000020section中的raw data為 32 Bytes alignment。
402MajorOperatingSystemVersion0x0
422MinorOperatingSystemVersion0x0
442MajorImageVersion0x0
462MinorImageVersion0x0
482MajorSubsystemVersion0x0
502MinorSubsystemVersion0x0
524Win32VersionValue0x0
564SizeOfImage0x0000DC40Image的 size,包含所有 headers。
CpuDxe.efi的 size就是0xDC40。
604SizeOfHeaders0x000002C0DOS stub、PE Header和 section headers的 size總和。
644CheckSum0x0
682Subsystem0x000B代表為 IMAGE_SUBSYSTEM_EFI_BOOT_SERVICE_ DRIVER。
702DLL Characteristics0x0
728SizeOfStackReserve0x0
808SizeOfStackCommit0x0
888SizeOfHeapReserve0x0
968SizeOfHeapCommit0x0
1044LoaderFlags0x0
1084NumberOfRvaAndSizes0x00000010Data Directories的數量。

Data Directories (PE32+)
OffsetSizeFieldValueDescription
1128Export Table0x0
1208Import Table0x0
1288Resource Table0x0
1368Exception Table0x0
1448Certificate Table0x0
1528Base Relocation Table0x0000DBC0
1608Debug0x0
1688Architecture0x0
1768Global Ptr0x0
1848TLS Table0x0
1928Load Config Table0x0
2008Bound Import0x0
2088IAT0x0
2168Delay Import Descriptor0x0
2248CLR Runtime Header0x0
2328Reserved0x0

Optional Header的下個部份則為 Section Headers,其數量可以從 COFF File Header
NumberOfSections讀出。

Section Header
OffsetSizeFieldDescription
08Name8 Bytes的 ASCII字串,代表此 section的名字。
84VirtualSize此section在記憶體中的 size,如果大於 SizeOfRawData
則後面會填上 0x0。
124VirtualAddress此 section在記憶體中相對於 ImageBase的起始位址。
164SizeOfRawDatainitialized date的 size。
204PointerToRawDatasection raw data的 offset。
244PointerToRelocationsRelocation table的 offset。
284PointerToLinenumbersLine Number table的 offset。
322NumberOfRelocationsRelocatione table的數量。
342NumberOfLinenumbersLine Number table的數量。
364Characteristics32 Bits flag。

CpuDxe.efi可以使用 xpeviewer讀出 6個 sections:


Section NameContent
.textExecutable code
.rodataRead-only initialized data
.dataInitialized data
.xdataException information
.relocImage relocations

2022年7月21日 星期四

Beyond BIOS Note - CH5 UEFI Runtime


Adding manpower to a late software project makes it later.
- Brook's Law

UEFI 提供兩種主要的 service來操作及控制系統資源:

  • Boot Services
  • 提供開機期間相關的系統服務,在 ExitBootServices()被呼叫之後就無法使用。

  • Runtime Services
  • ExitBootServices()之後還可以使用,OS 需要其來完成一些系統資源的操作。


Memory Type

UEFI在 allocate記憶體的時候,會需要指定這段記憶體的 EFI_MEMORY_TYPE,來代表其使用目 的。EFI_MEMORY_TYPE也分成只在 ExitBootServices()前可以使用及在 ExitBootService ()後也 能使用。詳細 EFI_MEMORY_TYPE使用可參考 UEFI Specification。


EFI System Table

EFI System Table 中主要有兩個服務會在 Runtime使用:

  • Runtime Services Table
  • 提供所有 Runtime Services的指標。

  • UEFI Configuration Table
  • 由 GUID/Pointer 配對組成,可以是提供給系統的 function pointer、data或 table, 像是 SMBIOS及 ACPI table的 entry point。


Time Services

Runtime Services其中還有包含 Time Services的部分,讓 OS可以不用透過直接讀取硬體的方式 來取得系統的時間資訊。相關的 function有 GetTime()、SetTime()、GetWakeupTime()和 SetWakeupTime()。


Virtual Memory Services

ExitBootServices()之後,OS會透過 SetVirtualAddressMap()提供其虛擬記憶體的資訊 來將 Runtime Services從實體記憶體定址到虛擬記憶體。ConvertPointer()提供 UEFI的程式本身來轉 換虛擬記憶體。在 SetVirtualAddressMap()轉址前,會先執行註冊EVT_SIGNAL_VIRTUAL_ADDRESS_CHANGE的 Event。


Variable Services

Variable的主要作用在於 OS Loader與 firmware之間傳遞資料,對於不同的 platform可能有不同 的實作,但其要能在 reset的時候也可以保存資料。

VariableNameVariableGuid 用來命名不同的 Variable。VariableName通常是人讀得懂的文字 ,也不用擔心其重複,還有 VariableGuid可以用來分別。

有三個主要的 Attributes需要注意:

  • Nonvoliatile
  • 在 System Reset之後 Variable依然可以保留。

  • BootService
  • 代表只有在 ExitBootService()之前可以使用,之後的 GetVariable()及 GetNextVariable()都會無法找到。

  • RuntimeService
  • 有這個代表 BootService也要同時被設定, ExitBootServices()之後也能存取。

只有同時擁有 Nonvoliatile和 RuntimeService的 Variable可以在 ExitBootServices()之後使用 SetVariable()來寫入。而只有 RuntimeService的則是 read-only,原因是記憶體的控制權已經交 給了 OS。


Miscellaneous Services

  • GetNextHighMonotonicCounter
  • ResetSystem
  • UpdateCapsule
  • QueryCapsuleCapabilities

沒什麼想寫的,有想法再回來補充。


2022年7月19日 星期二

[Python] 使用 Python的 venv建立虛擬環境

相關文章:
使用 Virtualenv 開發 Python

先前都是使用 Virtualenv來建立 Python開發的虛擬環境,但在 Python後面的版本,其本身就內 建了虛擬環境的模組 venv。

  • 使用 venv 建立虛擬環境
將路徑切換至需要建立虛擬環境的目錄下,並執行:
python -m venv [env_name]
env_name為所要建立虛擬環境的名稱,執行完後就會在目錄下產生名為 env_name的資料夾

  • 啟動虛擬環境
Windows:
[env_name]\Scripts\activate.bat
Unix like系統: source [env_name]/bin/activate
啟動成功後,視窗中會出現 [env_name]的提示字元,表示正在運行虛擬環境。
接下來,就可以使用 pip來安裝需要的模組,可參考:
套件管理程式 - pip

  • 離開虛擬環境
Windows:
[env_name]\Scripts\deactivate.bat

Reference:
https://docs.python.org/zh-tw/3/tutorial/venv.html

2022年7月18日 星期一

PCI Enumeration - PCI Root Bridge IO Driver

PCI Enumeration是我做 BIOS這幾年還未跨過去的一道坎,也只是片段零碎地在 debug的過
程中摸索,看不清楚全貌。最近看了 "EDK II EFI Driver Writers Guide"的 "PCI Driver
Design Guidelines
"覺得獲益良多,許多觀念在讀這章的過程中重新整理了一次,所以藉由這
機會來重頭 study EDK II中關於整個 PCI Enumeration的程式碼,打鐵趁熱。

Pci Enumeration 在 EDK II主要由 PCI Root Bridge Io DriverPCI Bus Driver以及 PCI Driver
這三種 Driver來完成。這三者的主要工作與概念在"PCI Driver Design Guidelines"寫得很清
楚,就不著墨在這。而 PCI Driver又太多種,所以本篇目前只專注在 PCI Root Bridge Io Driver
及 PCI Bus Driver的程式碼上。

PCI Root Bridge Io Driver

從Entry Point InitializePciHostBridge開始看吧:

  RootBridges = PciHostBridgeGetRootBridges (&RootBridgeCount);
  if ((RootBridges == NULL) || (RootBridgeCount == 0)) {
    return EFI_UNSUPPORTED;
  }

好,我承認第一段就有點卡關,Host BridgeRoot Bridge分別到底是什麼? 先看一下 PCI_HOST_BRIDGE_INSTANCE的結構:

typedef struct {
  UINTN                                               Signature;
  EFI_HANDLE                                          Handle;
  LIST_ENTRY                                          RootBridges;
  BOOLEAN                                             CanRestarted;
  EFI_PCI_HOST_BRIDGE_RESOURCE_ALLOCATION_PROTOCOL    ResAlloc;
} PCI_HOST_BRIDGE_INSTANCE;

PCI_HOST_BRIDGE_INSTANCE的結構裡含有 RootBridges的 Linked List,代表一個 Host Bridge 可能有一個至多個 Root Bridge。又從後面的註解可以看到,EDK在 PCI Enumeration的情況只考慮系統只會有一個 Host Bridge。 可以理解成 Host Bridge是比 Root Bridge還上層的東西。

  //
  // Most systems in the world including complex servers have only one Host Bridge.
  //
  HostBridge = AllocateZeroPool (sizeof (PCI_HOST_BRIDGE_INSTANCE));
  ASSERT (HostBridge != NULL);

  HostBridge->Signature    = PCI_HOST_BRIDGE_SIGNATURE;
  HostBridge->CanRestarted = TRUE;
  InitializeListHead (&HostBridge->RootBridges);
  ResourceAssigned = FALSE;

翻開 PCI的 spec,可以看到 PCI Bus就是透過 Host Bridge來與系統上的 CPU及 Memory連接的。而到了 PCI Express, Host Bridge的功能就被包含在 Root Complex中。


Root Bridge的詳細描述可以在UEFI spec中找到,其是用以產生實體 PCI Bus的 chipset component。一個 Host Bridge可以有一個或多個 Root Bridge。下列兩個 UEFI spec中提到的比較常見的系統範例。

只有一個 Root Bridge:

多個 Root Bridge:

UEFI spce也有多個 Host Bridge的系統範例,這裡就不貼出來了。在我先前的經驗只有碰過一 個 Host Bridge和一個 Root Bridge的情況,所以這兩個東西才會讓我如此困惑,有時候也會混 在一起說。

另外其中還提到,PCI Segment與 Host Bridge和 Root Bridge是不同的概念。PCI Segment指的 是共用相同 PCI Configuration Space的 PCI Bus之集合,最多能有 256個 Bus。Root Bridge 可能包含整個或是部分的 PCI Segment。Host Bridge若是有多個 Root Bridge,則很有可能有 多個 PCI Segment。

再回到第一段 code,其用意就是要知道系統中有幾個 Root Bridge,其中的方法是去掃 Bus 0 - 255,如果 Bus上有 Device,就表示 Root Bridge存在,而在掃的過程中要去扣除掉 PCI to PCI Bridge所產生出來的 Bus。

當然,如果本來就是知道系統中有多少 Root Bridge,我也是看過直接 hard code的。

接下來 InitializePciHostBridge還會將每個 RB所用到的 MMIO及 IO透過 DXE service回報
給 GCD (Global Coherency Domain) ,讓系統來管理所能使用的 resource。

並在 Root Bridge Handle上安裝 PCI Root Bridge IO Protocol來讓之後的 PCI Bus Driver使用。

2022年7月13日 星期三

Git - 改變目錄名稱的大/小寫

話說有天心血來潮,想要把自己某個 side project的資料夾名稱從大寫的 Config改成小寫的 config。 但手動改成小寫後,git status指令的狀態不會有任何變化,於是查了一下,發現可以使用 git mv 指令來達到我要的效果。


$ git mv ./Config ./config1
$ git mv ./config1 ./config

透過一個過渡的目錄名稱 ./config1來達到我要的效果。還有另一個好處是 git mv之後的檔案都是 git add/rm之後的狀態,接下來直接 commit就行了。

由於 git mv本身就是移動或重新命名檔案或目錄的命令,直接使用:

$ git mv ./Config ./config
Rename from 'config' to 'Config/config' failed. Should I try again? (y/n)

git 以為是要把當前的 ./Config移動到 ./config下,會出現 fail。

而改變檔案名稱的大/小寫是可以直接使用 git mv的:

$ git mv a.txt A.txt

補充:
git的大小寫名稱行為似乎是跟 OS的檔案系統本身是不是 case sensitive有關。
透過 git config能改變 git case sensitive的行為。

2022年7月12日 星期二

Beyond BIOS Note - CH4 Protocols You Should Know


Common sense ain't common.
- Will Rogers

EFI OS Loaders

OS loader是一種特殊的 UEFI Application,用來讓系統從 firmware
環境轉換到 OS環境。

  1. 要確定是從哪被 load,這能讓其從相同位置取得其他檔案。
  2. 要確定 OS被存放在哪。OS可能會在硬碟中的某個 partition,所以 OS Loader
    需要實作或讀取檔案系統的驅動來存取OS partition的檔案。
  3. 需要建立實體記憶體的 memory map回報給 OS Kernel,有些 memory resource是
    OS不能碰的,所以 OS Loader也需要從UEFI API來獲得系統當前的 memory map。
  4. OS 能將 boot path及 boot options以環境變數的形式存在 nonvolatile storage
    中。OS Loader也會使用這些環境變數,並且也需要將某些傳遞給 OS Kernel。
  5. 呼叫 ExitBootService ()後,UEFI Boot Service已經無法再使用,控制權轉交
    OS Kernel,OS Kernel只能使用 UEFI Runtime Service。

2022年6月21日 星期二

Macro 進階用法 - X Macro


C/C++ 語言常使用 Macro 來預先定義一些常常用到的值或程式碼片段,讓整體的
程式看起來更簡潔。

X Macro是種 Macro更進階的使用「方法」,而不是另一種「功能」。所以只要有
支援定義 Macro功能的程式語言,也可以使用。

其透過 "#define"與 "#undef"來替換 "X"的定義可以達到各種神奇的效果。

以下是一種最簡單範例:

#include <stdio.h>

#define LIST_OF_NAMES \
  X(Alice) \
  X(Bob) \
  X(Charlie) \
  X(Dan) \
  X(Emily)

int main() {
#define X(name) printf ("Hello %s\n", #name);
  LIST_OF_NAMES
#undef X
  return 0;
}


Output:

Hello Alice
Hello Bob
Hello Charlie
Hello Dan
Hello Emily

我在 LIST_OF_NAMES宣告由 "X()"組成的函數,這時的 "X"還沒有被定義。
在 "main()"中,才把 "X()"定義成使用 printf函數印出 name參數並呼叫
LIST_OF_NAMES。

如果將 LIST_OF_NAMES的 X Macro展開來寫,就會是這個樣子:

#include <stdio.h>

#define LIST_OF_NAMES \
  printf ("Hello %s\n", Alice); \
  printf ("Hello %s\n", Bob); \
  printf ("Hello %s\n", Charlie); \
  printf ("Hello %s\n", Dan); \
  printf ("Hello %s\n", Emily);

int main() {
  LIST_OF_NAMES
  return 0;
}

而 X Macro最妙的用法還在於可以替換"X"的定義,使其重複利用:

#include <stdio.h>

#define LIST_OF_NAMES \
  X(Alice) \
  X(Bob) \
  X(Charlie) \
  X(Dan) \
  X(Emily)

int main() {
#define X(name) printf ("Hello %s\n", #name);
  LIST_OF_NAMES
#undef X

#define X(name) printf ("Hi, I am %s\n", #name);
  LIST_OF_NAMES
#undef X
  return 0;
}

Output:

Hello Alice
Hello Bob
Hello Charlie
Hello Dan
Hello Emily
Hi, I am Alice
Hi, I am Bob
Hi, I am Charlie
Hi, I am Dan
Hi, I am Emily

2022年4月17日 星期日

Chocolatey - Windows 軟體套件管理工具


官方網址
https://chocolatey.org

Chocolatey 可以讓 Windows以 command line的形式來安裝及管理軟體套件,類似
Linux使用的 APT。

使用Powershell 安裝


1. 以系統管理員權限執行 Powershell。

2. 在 PowerShell執行以下命令
Set-ExecutionPolicy Bypass -Scope Process -Force; [System.Net.ServicePointManager]::SecurityProtocol = [System.Net.ServicePointManager]::SecurityProtocol -bor 3072; iex ((New-Object System.Net.WebClient). DownloadString('https://community.chocolatey.org/install.ps1'))

3. 重新開機。

4. 在 Powershell執行 choco,確認是否安裝成功。
choco

Chocolatey v1.1.0

Chocolately 操作


安裝套件,以 jq為例:
choco install jq

2022年4月15日 星期五

Legacy PCI IRQ Routing (PIC)

PCI Configuration Space Header

PCI Local Bus spec中定義了兩個 register,Interrupt Line (0x3C)及 Interrupt Pin (0x3D)

Interrupt Line (0x3C)

BIOS會負責填入此 PCI device的 interrupt pin在系統上所使用的 IRQ number。
這個 register不會被 device本身使用,而是給 driver或 OS看的。

Interrupt Pin (0x3D)

PCI device透過 Interrupt Pin來發出中斷的信號,分別為INTA#、INTB#、INTC#及 INTD#。
可從此 register的值來判斷這 device或 device function所使用的 Interrupt Pin是哪一個,
在出廠時就固定了。(1=INTA# 2=INTB# 3=INTC# 4=INTD#)

PCI IRQ Router

Intel 南橋提供8個 PIRQn#來讓 BIOS決定PCI device的 interrupt pin要 route
到哪個 IRQ。

透過 LPC register 0x60-0x63 (PIRQA#-PIRQD#)及 0x68-0x6B (PIRQ#E-PIRQ#H)
來設定所使用的 IRQ number。

PCI IRQ Routing Specification

BIOS要負責提供 PCI routing的資訊,例如PCI Slot的 interrupt pin是接到Pci IRQ Router 的哪
個pin,藉此讓 OS能夠判斷 IRQ是由哪個 PCI device所觸發的。

Legacy BIOS時代便是由 Microsoft所規範的 PCI IRQ Routing Specification中的 PCI IRQ
Table來實現。

PCI IRQ table會以 16-byte boundary形式存放在系統記憶體 F0000h - FFFFFh(F segment)中,
其開頭為 $PIR。

Byte OffsetSize in BytesName
04Signature
42Version
62Table Size
81PCI Interrupt Router's Bus
91PCI Interrupt Router's DevFunc
102PCI Exclusive IRQs
124Compatible PCI Interrupt Router
164Miniport Data
2011Reserved (Zero)
311Checksum
3216First Slot Entry
4816Second Slot Entry
N+1*1616Nth Slot Entry

Slot Entry
Byte OffsetSize in BytesName
0BytePCI Bus Number
1BytePCI Device Number (in upper five bits)
2ByteLink Value for INTA#
3WordIRQ Bitmap for INTA#
5ByteLink Value for INTB#
6WordIRQ Bitmap for INTB#
8ByteLink Value for INTC#
9WordIRQ Bitmap for INTC#
11ByteLink Value for INTD#
12WordIRQ Bitmap for INTD#
14ByteSlot Number
15ByteReserved

Link Value for INTn#

代表此 INTn#所連接到的Interrupt Router's Pin (PIRQm#),若為 0則代表沒有連到
任何 PIRQm#。

IRQ Bitmap for INTn#

代表此 INTn#能使用的 IRQ。Bit0代表 IRQ0,Bit1代表 IRQ1以此類推。

2022年4月6日 星期三

Hello CMake


Source

CMake
https://cmake.org/

Visual Studio Community 2019
https://visualstudio.microsoft.com

以建立一個名為HelloCMake的專案為例,在 HelloCMake的目錄新增 CMakeLists.txt
檔案及放入專案程式碼 HelloCMake.cpp,如下:

HelloCmake
├ ─ ─ ─ CMakeLists.txt
└ ─ ─ ─ HelloCMake.cpp


CMakeLists.txt
cmake_minimum_required(VERSION 3.23)

# set the project name
project(HelloCMake)

# add the executable
add_executable(HelloCMake HelloCMake.cpp)

cmake_minimum_required

指定 CMake最低版本需求。

project

設定專案名稱。

add_executable

從指定的 source來產生執行檔。

Build CMake


在 HelloCMake的目錄下建立名為 build的目錄。
mkdir build


切換到 build,執行 cmake命令並指定 CMakeLists.txt所在的目錄。
cd build
cmake ../

在產生完 CMake檔案的 build下開始編譯
cmake --build .